Contribution guide
Information on how to make contributions to the tsfpga project.
Setting up development environment
For tsfpga development we have a lot more python dependencies than when simply using the package. Install further dependencies with:
python -m pip install --upgrade --requirement tsfpga/requirements_develop.txt
You also need VUnit installed somewhere where python can find it.
Maintaining changelog
We maintain a changelog according to the keep a changelog format.
The unreleased changelog in doc/release_notes/unreleased.rst shall be updated continuously,
not just at release.
Release note files are in the rst format, inspect older release note files to see the
formatting details.
How to build documentation
Documentation is built using the tools/build_docs.py script.
The documentation pages have information about python unit test code coverage.
So before building documentation you must run pytest with coverage reports enabled like in CI:
python3 -m pytest -v --cov tsfpga --cov-report xml:generated/python_coverage.xml \
  --ignore tsfpga/test/functional/vivado/ \
  --ignore tsfpga/test/functional/commercial_simulators/ \
  --cov-report html:generated/python_coverage_html tsfpga
If want to skip handling of coverage for the documentation there is a flag available in the script,
see build_docs.py --help.
How to make a new release
Releases are made to the Python Packaging Index (PyPI) and can be installed with the python
pip tool.
To make a new release follow these steps.
Test CI status
Before doing anything, launch an Actions workflow run from main branch to see that everything
works as expected.
The CI environment is stable but due to things like, e.g., new pylint version it can
unexpectedly break.
When the workflow has finished and is green you can move on to the next step.
Review the release notes
Check the release notes file unreleased.rst.
Fill in anything that is missing according to Maintaining changelog.
Determine new version number
We use the Semantic Versioning scheme. Read the Summary at the top of that page and decide the new version number accordingly.
Run release script
Run the script
python3 tools/tag_release.py X.Y.Z
where X.Y.Z is your new version number. The script will bump the version number of the Python package, and copy release notes to a new file. The changes will be committed and then tagged.
Push tag to deploy release
git push origin vX.Y.Z
WARNING: Avoid the git push --tags command, which is dangerous since it pushes all your
local tags.
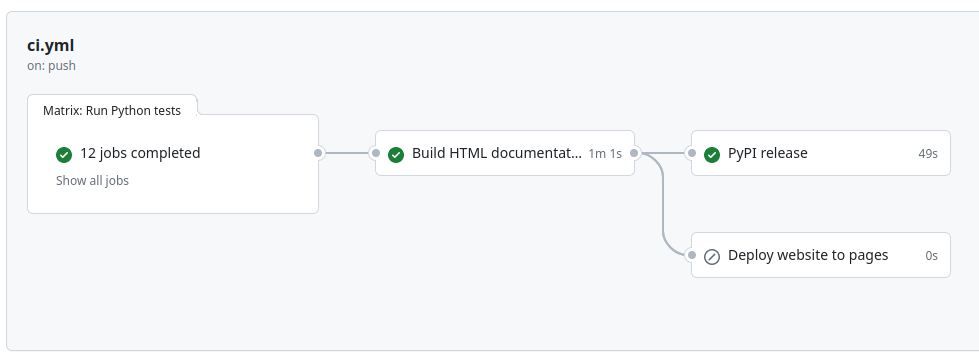
Pushing a tag will create a special Actions run on GitHub:

Usually, CI runs on pull request branches, but this run is on the tag itself.
The run for the tag will execute the additional job PyPI release:
Wait until the workflow is finished and all green, meaning that the release has been deployed to PyPI. Visit https://pypi.org/project/tsfpga/ to make sure that the new release is available.
If anything goes wrong in the CI run, you can delete the tag and start over.
git tag --delete vX.Y.Z
git push origin --delete  vX.Y.Z
WARNING: Be extremely careful with this command. Do not delete any other tags.
Merge release commit
This step is unnecessarily complicated due to the fact that GitHub does not allow a fast-forward merge in their Pull Request web UI. A GitHub repo with linear history will use the “rebase and merge” strategy, which changes the SHA of the commits. Hence, the tag that we just pushed will not match any commit on the main branch, if we merge our release commit via the web UI. (See https://stackoverflow.com/questions/60597400).
Instead, this has to be done manually on the command line, and can only be done by a user with complete privileges to the repository.
git push origin HEAD:main
WARNING: Be very careful with this command and inspect locally that you do not push anything else than intended.